This article will show you how to create a pre-configured Citrix Client and leverage Active Directory to deploy the client as well as overcome some of the idiosyncrasies found in the Citrix Client packager.
Download any Xenapp Client from here.
This article will show you how to create a pre-configured Citrix Client and leverage Active Directory to deploy the client. You may ask, “Why would I want to use Active Directory to deploy the client. Doesn’t Citrix offer the Auto Client Update?” The answer is yes, Citrix does provide an auto client update feature, but there are limitations such as:
If a workstation already has a Citrix client that was installed from an .msi package, then you cannot use the Auto Client Update feature.
From page 90 of the Citrix client Administrator’s Guide:
“Important You cannot automatically update previous versions of the client installed with Windows Installer (.msi) packages. You must redeploy a client installer package when a new version of the client is released.”
Also, refer to
Citrix Article CTX108584.
The Auto Client Update feature also adds steps to the logon process since it has to check to see if the workstation has an up-to-date client. This can cause longer login times and user frustration. In fact, I recommend you turn off the Auto Client Update feature via a Citrix policy:
 Getting Started
Tools Needed:
- Citrix Presentation Server Client Packager
- ORCA to modify the MSI file (today’s trivia, ORCA stands for One Really Cool Application)
- Citrix Transform File to enable Single Sign On in the MSI file (optional)
The first thing you will need to do is get the Citrix Presentation Server Client Packager. You can download the latest Citrix Client Packager at
http://www.citrix.com/download. The Citrix Client Packager contains the Citrix Program Neighborhood client, the Citrix Web client, and the Citrix Program Neighborhood Agent client.
Quote from Citrix:
You can customize the client packager to deploy and maintain any number and combination of clients network-wide. Based on Windows Installer technology (msi), the client packager lets you install, uninstall, modify, and repair clients as well as perform controlled client upgrades. An easy-to-use wizard guides you through the configuration step by step.
Create an Admin Install of the Citrix Client Packager
This is the part where you pre-configure the client(s).
Run msiexec /a Ica32Pkg.msi to create an administrative install of the package.
Note: this doesn’t actually install the client; it just creates the customized client installation files.


Select the “Uncompressed” option if you want to make modifications to the files (such as
branding the client).
For this exercise, I have chosen not to install the full Program Neighborhood Client.

Important: If you elect to use the Local Name and Password, you will need to modify the MSI file using a transform (MST) file in order for this to work. More on this later.

In this example, I removed all the dialog boxes. It is not necessary to show any dialogs since we are going to push this client via Active Directory.
 Making Post Setup Modifications
There are a couple of common post setup modifications that need to be made for the options I chose in this exercise. The first modification involves a bug in the client packager. If you specify not to install the Program Neighborhood client (as I chose not to in this exercise), it will still be installed to the workstation anyway as “Install on Demand” (see
Citrix Article CTX105642).
So, to get around this, you will need to modify the MSI file by following these steps:
- Launch ORCA.
- Open the admin install MSI file (Ica32Pkg.msi) created earlier.
- Select the Condition table.
- Change the condition to “Not Installed” for the Program Neighborhood client.

There is another “feature” in the client packager that puts an icon for Program Neighborhood on the workstation desktop even if you chose not to install Program Neighborhood (see
Citrix Article CTX108212)
So, once again, it’s ORCA to the rescue:
- Launch ORCA.
- Open the admin install MSI file (Ica32Pkg.msi) created earlier.
- Select the Shortcut table.
- Right click the row with “DesktopFolder…” in the Directory column and select Drop Row.
 Enable Single Sign On for Active Directory Deployment
There is yet another “feature” in the client that disables single sign on in the client when deploying via Active Directory (see
Citrix article CTX103439). As the article states, you will need to apply a transform (MST) in order for Single Sign On to work.
- Download slfregfix.mst from http://support.citrix.com/article/entry.jspa?entryID=3936
- Launch ORCA
- Open the Ica32Pkg.msi file created above.
- Select Transform -> Apply Transform…
- Browse to slfregfix.mst.
- Click on File -> Save Transformed As… and save the package as a different name (such as mod_Ica32Pkg.msi).

Deploy the Package with Active Directory
Finally, after all the blood sweat and tears to create the admin install client package, you can deploy the package with Active Directory. The question you must answer here is do you want to assign or publish this package? Also, if you assign the package, do you want to assign it to computer or user objects? In this exercise, I assigned the package to computer objects. (For more information about assigning and publishing packages via a GPO with Active Directory, check out
Active Directory® for Microsoft® Windows® Server 2003 Technical Reference)
I
strongly suggest you toughly test this in a separate test environment if you have one. If you do not have a separate test environment, at least create a test OU in your Active Directory to try this out.
- Open up Active Directory Users and Computers.
- Right click on the OU you want to use to host the GPO to deploy the package and select Properties
- Select the Group Policy tab.
- Click edit to edit an existing Group Policy or New to create a new Group Policy. (Again, I suggest creating a new GPO for testing purposes).
- Browse to Computer Configuration -> Software Settings -> Software installation.
- Right click Software installation and select New -> Package.
- Browse to the package created above.
- Select Assigned on the Deploy Software Dialog.

Now, any computer object you move into this OU will automatically have the pre-configured Citrix ICA client installed upon logon (I suggest you only try moving a few computer objects into the OU for testing purposes).


 -----
----- List of servers with Rollup Pack installed (in the example the Rollup Pack 6 for PS 4.0)
 If the Rollup Pack is not installed (in the example Rollup Pack 05 for a PS 4.0)


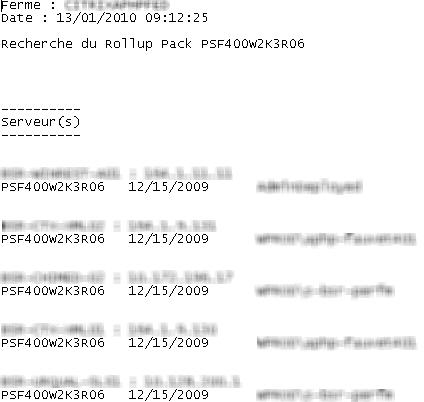 List of servers with Rollup Pack installed (in the example the Rollup Pack 6 for PS 4.0)
 If the Rollup Pack is not installed (in the example Rollup Pack 05 for a PS 4.0)