Tuesday, July 5, 2011

Remove a dead Citrix server from the farm.

Synopsis On a Citrix PS 4.5 farm qfarm /offline continuously showing a server offline which was already demoted from the farm.

Resolution  First we need to remove the server from our datastore. For that just open a command prompt from any of the PS server and execute the below command.

 dscheck /full servers /clean
 [ Make cure you have full backup of your datastore ]


It removes all the inconsistent Citrix servers from the farm.Then again check the qfarm /offline status. If it's still there then please wait for the LHC polling interval to replicate the datastore changes to LHC. If you want to manually sync the LHC then go to your data collector and recreate the LHC (dsmaint recreatelhc) by setting the registry key value PSRequired to 1. [HKLM\Software\Citrix\Runtime]. Or you can manually refresh the LHC also by executing the dsmaint refreshlhc command.


Saturday, June 18, 2011

Manually remove Xenapp Server.

It happens in rare extreme cases that we should remove the XenApp mano, and of course you are on a physical host and the backup is older .. (We told you so ... in a few extreme cases :) ).
The CTX746354 provides the best practices to remove XenApp manually and cleanly.
In step 4 of the CTX746354We have eliminated many registry keys (about 650 :) ).
In this post you'll find the file Delete_reg_xenapp.txt which includes all the keys to remove.
On the server recalcitrant, copy the file Delete_reg_xenapp.txt and rename it Delete_reg_xenapp.reg then double click it.
You just save time, and you can proceed to Step 5 of the CTX746354 .
Once in a step 10, you will have to check that all services XenApp are deleted.
If this is not the case, the file Delete_service_xenapp.txt attached to this ticket will allow you to do it quickly.
On the server recalcitrant, copy the file Delete_service_xenapp.txt and rename it Delete_service_xenapp.bat then double click it.
You can skip to step 11 of the CTX746354 (Deleting the passage is almost over, courage ;) ).
Files Delete_reg_xenapp.txt and Delete_service_xenapp.txt were tested on a Windows 2003 server Sp2 Fr, XenApp 5 R03.


How to change the ICA client language?

Users can choose the user interface language of the ICA Client for Win32 10.x and above through a dialog box the ICA Client provides during installation.
If users want to change the Language after the installation this can be done from the command line. Simply open a command prompt, browse to the ICA Client directory and run
Wfica32.exe /UserUILocale

 Then add the required language and move it to the top of the list.


After a restart the ICA Client should appear with the new language selected.
Regards
Ankan

Thursday, May 26, 2011

Xenapp 6 and MS Windows 2008 R2 SP1 - Known Issues.

Symptoms :   Although Citrix Systems supports Microsoft Windows Server 2008 R2 SP1 with Citrix XenApp 6, users of Microsoft Server 2008 R2 SP1 must be aware of certain issues when using it in conjunction with this product as outlined in CTX122601 - Microsoft Windows Server 2008 R2 - Known Issues
You cannot connect to Citrix sessions when Microsoft Windows Server 2008 R2 SP1 is present.
Trying to use the quick launch tool CTX122536 – Citrix Quick Launch to the server IP address hung at: “Connection established. Negotiating capabilities...”
“Qwinsta” from a command line returned no information and just left a blinking cursor.
Svchost.exe crashes in TermService


Trying to use the quick launch tool to launch a published application hangs at “launching.”


Note: When verifying this issue against the release to manufacturing of Microsoft Windows Server 2008 R2 SP1, the reviewer was unable to install the Citrix Hotfix XA600W2K8R2X64001 on this unstable server. The windows installer seems to hang, but upon restarting the server, the hotfix is installed.

Workaround :   Install Citrix Hotfix XA600W2K8R2X64026, CTX127360


Friday, May 20, 2011

Citrix XenApp 6 – Why it doesn’t spread ?

Citrix XenApp 6 is one year old product already and still not wide deployed (In my country at least, France). Why ? I think about two reasons :
Mostly because you can install XenApp 6 only on Microsoft Windows 2008 R2 which is only 64Bits operation system from Microsoft and because there are many features just disappearing from this version but a lot of new ones.


XenApp 6 :

  • No more Installation Manager (Just remain a read only console to deploy past packages)
  • No more Resource Manager (EdgeSight is suppose to do the job)
  • No more Access database for the DataStore, now it’s replace by MS SQL Express 2008
  • No possibilities to have mixed farms
  • Farms settings are now store in IMA and/or Global policies
  • New feature, Worker Groups
  • New feature, Global Policy (XenApp Policies in the Active Directory)
  • New management console (Only one !) Citrix Delivery Services Console, at last ;)
  • Simplified Install
  • HDX RealTime Collaboration & HDX RealTime audio

Sunday, May 15, 2011

Can't run RSOP.MSC ........ Access Denied.

I was trying to track down an issue today that I thought was group policy related. I kept getting access denid when I tried to run the RSOP.MSC. I found an article on the web with the fix.


cd %windir%\system32
regsvr32 /n /I userenv.dll
cd wbem
mofcomp scersop.mof
gpupdate /force
 

Monday, April 18, 2011

Xenapp Farm License Server name field blank.

We met (again with Menhir Two ;) ) A side effect of the cmdlet "Get-XAServerConfiguration (in CTP V3 not up to date)
Indeed, when calling the cmdlet, we get the following error: " Failed to read all bytes in a uint value ".


The side effect it was surprising (especially for a GET  ;) ):


And here is more license server in the farm XenApp :( (However, if your servers do not have the legacy of the game enabled license server, the edge effect will have no impact).
The side effect is known (including this post on the forum Citrix Us).
The solution is to update the Cmdlet (you must first uninstall the CTP (Command Technology Preview), then install the latest CTP (in our case that of 13/01/11)

Once the cmdlet to get command-day work XAServerConfiguration nickel and no side effect.
Download the new Citrix Commands from here.

Saturday, April 16, 2011

What is the puropose of the Citrix Start-up License?


Startup License

The startup license does not affect your license count. It is used to allow Citrix
products to communicate with the license server using a continuous open
connection. Every five minutes the license server and the products send a
heartbeat message to each other to verify that they are mutually communicating.
Note Some Citrix products can operate in a disconnected mode (not connected
to the server). These products allow a user to check out a license and operate the
product for a preconfigured period of time that is set by the administrator. In this
case, heartbeat messages are not exchanged. One example of disconnected mode
is when a user checks out a Password Manager license for a laptop, and then uses
the laptop when it is not connected to the server.

Friday, April 15, 2011

How to Deploy the CitrixOnlinePluginWeb.exe Client 11.2 on Web Interface 5.2

Summary
This article describes how to deploy the new CitrixOnlinePluginWeb.exe client 11.2 through Web Interface 5.2.
Requirements
To deploy the CitrixOnlinePluginWeb.exe Client 11.2 through Web Interface 5.2 server, you need to download the CitrixOnlinePluginWeb.exe from:
Citrix Online Plugin Version 11.2

An alternative method is to download the XenApp 5.0 Feature Pack 2 that contains the Citrix Receiver and Plug-ins.

Procedure
Method #1
  1. After you download the Citrix XenApp 5.0 Feature Pack 2 and extract the contents, copy the Windows folder (found inside the Citrix Receiver and Plug-ins folder - see Figure 1) and paste it under \Program Files\Citrix\Web Interface\5.2.0\Clients (see screen shot below):

The Clients directory content should look like the following screen shot after pasting the Windows folder:

  1. Check the permissions on the Windows folder, subfolders and contents as shown in the following table:
    Group/User Names Permissions
    Administrators (LocalServer\Administrators) Full Control
    Authenticated Users Read & Execute, Read
    NETWORK SERVICE Read & Execute, Read
  1. Open the Citrix Web Interface Management Console, select the Web Interface site, right-click on it and select Client Deployment.

Also, you can get to Client Deployment by selecting the Web Interface site and under XenApp – Edit Settings, select on Client Deployment.

  1. Make sure Native Client is selected and click on Properties.

  1. Select Client Detection and make sure Perform client detection at logon is selected and, if desired, select Offer upgrades for clients.

  1. Click OK and test.
  2. The new Web Client is available whenever there is no client installed or a client older than 11.2 is detected on the workstation.
Method #2
  1. If you decided to download just the CitrixOnlinePluginWeb.exe version 11.2 from www.citrix.com, create a folder called “Windows” under \Program Files\Citrix\Web Interface\5.2.0\Clients\ and a sub-folder called “Online Plug-in”. Move the CitrixOnlinePluginWeb.exe file to “Online Plug-in”.

  1. Make sure the permissions for the Windows folder, subfolder and EXE file are correct.
    Group/User Names Permissions
    Administrators (LocalServer\Administrators) Full Control
    Authenticated Users Read & Execute, Read
    NETWORK SERVICE Read & Execute, Read
  1. Perform the steps above on Method #1 to configure your Client Deployment inside the Citrix Web Interface Management Console.
To manually modify the minimum client version required do the following steps:
  1. Go to \Inetpub\wwwroot\Citrix\XenApp\conf and open the Webinterface.conf file with a text editor.(This location could change depending on where the site was created)
  2. Locate the following line
    #ClientIcaWin32=Filename:CitrixOnlinePluginWeb.exe,Directory:Windows,Mui:Yes,ClassID:238f6f83-b8b4-11cf-8771-00a024541ee3
  3. Uncomment it and append the minimum client version , Version:11,0,0(You can add whatever version you like)
    Example:
    ClientIcaWin32=Filename:CitrixOnlinePluginWeb.exe,Directory:Windows,Mui:Yes,ClassID:238f6f83-b8b4-11cf-8771-00a024541ee3, Version:11,0,0
  4. Save the WebInterface.conf file.
  5. Run the following command from a command prompt and test.
    IISRESET

Thursday, April 14, 2011

Citrix Web interface 5.4 unattended installation

Here’s a Powershell script that can be used to perform a simple unattended installation of the Citrix Web Interface.

Import-Module ServerManager
Add-WindowsFeature Web-WebServer, Web-Asp-Net, Web-Net-Ext, Web-ISAPI-Ext,Web-ISAPI-Filter
Add-WindowsFeature Web-Mgmt-Tools, Web-Scripting-Tools, Web-Mgmt-Service, Web-Mgmt-Compat
Add-WindowsFeature AS-NET-FRAMEWORK
Add-WindowsFeature NET-WIN-CFAC
$installing = $false
While(((Get-WmiObject -Query "SELECT * FROM Win32_Product WHERE Name Like 'Microsoft Visual J# 2.0%'").Name | Group-Object).Count.ToString -eq $null){
  if(-Not $installing){
    Write-Host "`nInstalling Microsoft J#"
    .\vjredist.exe /q:a /c:"install /q"
    $installing = $true
  }
  Start-Sleep -Seconds 2
}
$installing = $false
While(((Get-WmiObject -Query "SELECT * FROM Win32_Product WHERE Name = 'Citrix Web Interface'").Name | Group-Object).Count -eq $null){
  if(-Not $installing){
    Write-Host "`nInstalling Web Interface"
    .\webinterface.exe -q
    $installing = $true
  }
  Start-Sleep -Seconds 2
}
 

Wednesday, April 13, 2011

Inventory script for installing a Rollup Pack

In the log file, the server with and without the rollup package are now separated into two separate lists (the hots are ordered alphabetically)


-----
12/01/2010
-----
If you're passing a Rollup Pack on a farm PS 4.0 (in our case), and want to know the progress of the installation of Rollup Pack on your farm.
Farm_RollupV1.wsf script allows you to list all member servers of a farm, and tells you if the rollup pack is installed or not on each server.
In the script you change the variable MyRollup line 70, to specify the Rollup Pack that you want to inventory.
Once the script is executed, a file named XenApp_NomDeVotreFerme-MyRollup.txt is created at the root of C: (you can change the name and location of lines 74 and 77).
List of servers with Rollup Pack installed (in the example the Rollup Pack 6 for PS 4.0)
If the Rollup Pack is not installed (in the example Rollup Pack 05 for a PS 4.0)

At the end of the file you have three totals:
  • Total servers with Rollup pack installed
  • Total servers without the Rollup Pack
  • Total farm member servers
Be kind to the code ;)

Post Active Directory Cmdlets


Easter Egg XenApp

At a bend in PS 4.0 troubleshooting, one of our colleagues (AF) came across a pretty cool Easter Egg.
On a server PS 4.0, XenApp 4.5 or 5.0 (tested on a server in 2003), type the command line: query CITR! X

And you get the list of team engineer Citrix :).
Our screenshot was made on a XenApp 5.0, the list differs depending on the version of course ;) .
Looking in the registry is actually found in "HKEY_LOCAL_MACHINE \ SYSTEM \ CurrentControlSet \ Terminal Server \ Utilities \ query" value "CITR" x ".
This Easter Egg was already posted in eeggs.com (in particular), how do we pass rate:( .
It seems that Windows 2008 does not work without the kb958652 .

Remove a server or application via DsCheck.exe

Sometimes your DataStore contains corrupted records.

In our case a server whose registration was corrupted.
The only way (accessible) can check the status of your DataStore is the use of DsCheck.exe (dscheck command allows you to validate the consistency of the DataStore and can repair inconsistencies found).
A prior backup of the DataStore is recommended ;) .
Commands to delete an application in the DatasStore:

dscheck / full Apps "App Name" / deleteMF / SILENT
dscheck / full Apps "App Name" / deleteComApp / SILENT
Commands to remove a server in the DatasStore:

dscheck / full servers "Server HostName" / deleteMF / SILENT
dscheck / full servers "Server HostName" / deleteComApp / SILENT
The / DeleteMF deletes the entry of the record in the DataStore
The / DeleteComApp removes the common input in the DataStore.
If you want more information on DsCheck.exe:
CTX124406 (XenApp 4.5 / 5 for Windows 2003 32/64 Bits)
CTX107800 (Presentation Server 3.0/4.0 for Windows 2000/2003)

Monday, April 11, 2011

License Server 11.6.1 Admin Login Fails - The User name or password is incorrect.

Need to reset the password for admin user. (The default user name and password is admin. All the characters must be in lower case. It doesn't support any upper case)


Solution :  

1) Open the "server.xml" file in <system drive>:\Program Files\Citrix\Licensing\LS\conf. If on Win2k8 you will need to open your editor as an admin.

2) Find the entry that looks something like this:
<user firstName="System" id="admin" lastName="Administrator" password="(ENC-01)UaFz17cJ2oNQ+LkskjkzUyVV5ZcmaoJCDCiuiusbB6zk2P0uR" passwordExpired="false" privileges="admin"/>;

3) Erase the contents between the double quotes after "password="
4) Enter a plaintext password so it looks like this: password="test"
5) Change the passwordExpired value to be "true"
6) Save the server.xml file.
7) Restart the licensing services. I also closed and re-opened the LAC but this may not be necessary.
8) Log into the LAC using user name "admin" and the password you set.
9) You will be prompted to change your password. Do it. By doing it, the new password will be encrypted in the server.xml file.
10) To check that everything is working as planned, re-open the server.xml to check that the password is now encrypted.


Tuesday, April 5, 2011

Deploying a Pre-Configured Citrix Client using Active Directory

This article will show you how to create a pre-configured Citrix Client and leverage Active Directory to deploy the client as well as overcome some of the idiosyncrasies found in the Citrix Client packager.

Download any Xenapp Client from here.

This article will show you how to create a pre-configured Citrix Client and leverage Active Directory to deploy the client. You may ask, “Why would I want to use Active Directory to deploy the client. Doesn’t Citrix offer the Auto Client Update?” The answer is yes, Citrix does provide an auto client update feature, but there are limitations such as:
If a workstation already has a Citrix client that was installed from an .msi package, then you cannot use the Auto Client Update feature.
From page 90 of the Citrix client Administrator’s Guide:
“Important You cannot automatically update previous versions of the client installed with Windows Installer (.msi) packages. You must redeploy a client installer package when a new version of the client is released.”
Also, refer to Citrix Article CTX108584.
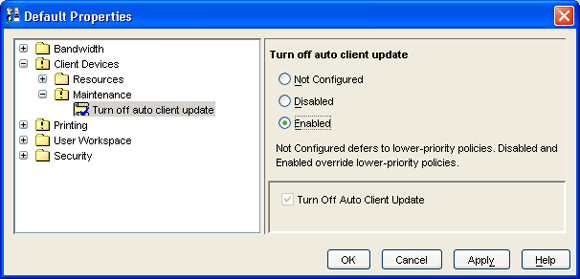
The Auto Client Update feature also adds steps to the logon process since it has to check to see if the workstation has an up-to-date client. This can cause longer login times and user frustration. In fact, I recommend you turn off the Auto Client Update feature via a Citrix policy:

Getting Started
Tools Needed:
  • Citrix Presentation Server Client Packager
  • ORCA to modify the MSI file (today’s trivia, ORCA stands for One Really Cool Application)
  • Citrix Transform File to enable Single Sign On in the MSI file (optional)
The first thing you will need to do is get the Citrix Presentation Server Client Packager. You can download the latest Citrix Client Packager at http://www.citrix.com/download. The Citrix Client Packager contains the Citrix Program Neighborhood client, the Citrix Web client, and the Citrix Program Neighborhood Agent client.
Quote from Citrix:
You can customize the client packager to deploy and maintain any number and combination of clients network-wide. Based on Windows Installer technology (msi), the client packager lets you install, uninstall, modify, and repair clients as well as perform controlled client upgrades. An easy-to-use wizard guides you through the configuration step by step.
Create an Admin Install of the Citrix Client Packager
This is the part where you pre-configure the client(s).
Run msiexec /a Ica32Pkg.msi to create an administrative install of the package.
Note: this doesn’t actually install the client; it just creates the customized client installation files.

Select the “Uncompressed” option if you want to make modifications to the files (such as branding the client).
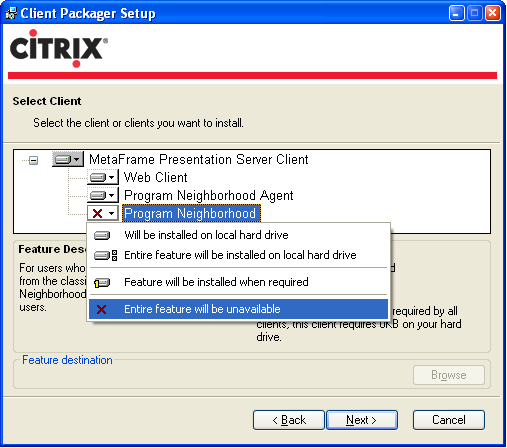
For this exercise, I have chosen not to install the full Program Neighborhood Client.

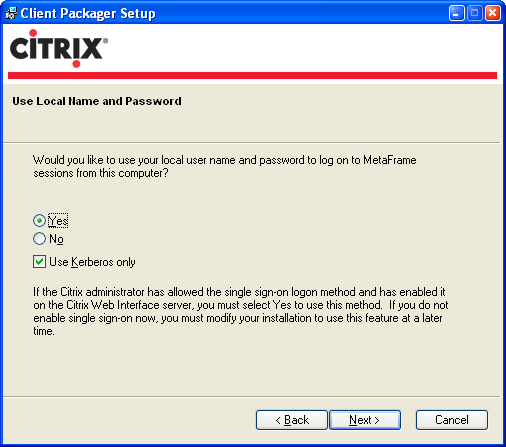
Important: If you elect to use the Local Name and Password, you will need to modify the MSI file using a transform (MST) file in order for this to work. More on this later.

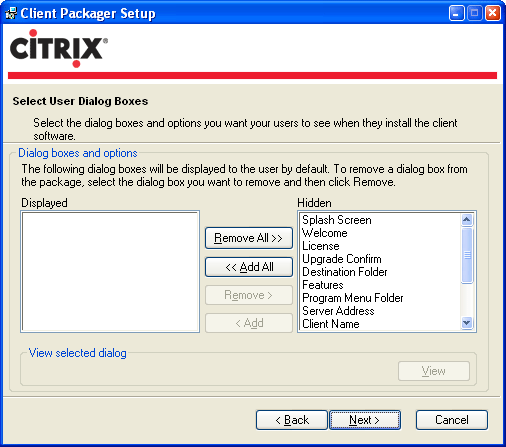
In this example, I removed all the dialog boxes. It is not necessary to show any dialogs since we are going to push this client via Active Directory.

Making Post Setup Modifications
There are a couple of common post setup modifications that need to be made for the options I chose in this exercise. The first modification involves a bug in the client packager. If you specify not to install the Program Neighborhood client (as I chose not to in this exercise), it will still be installed to the workstation anyway as “Install on Demand” (see Citrix Article CTX105642).
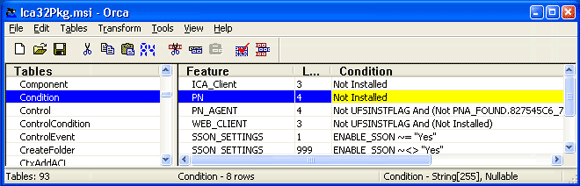
So, to get around this, you will need to modify the MSI file by following these steps:
  • Launch ORCA.
  • Open the admin install MSI file (Ica32Pkg.msi) created earlier.
  • Select the Condition table.
  • Change the condition to “Not Installed” for the Program Neighborhood client.

There is another “feature” in the client packager that puts an icon for Program Neighborhood on the workstation desktop even if you chose not to install Program Neighborhood (see Citrix Article CTX108212)
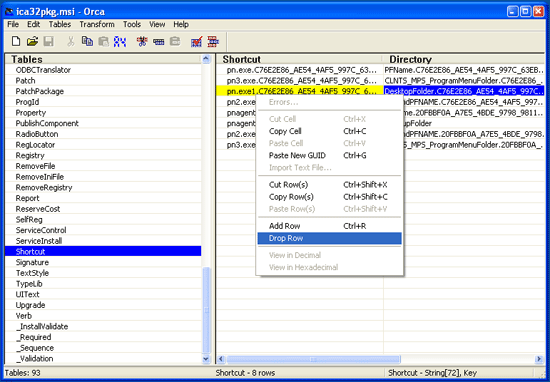
So, once again, it’s ORCA to the rescue:
  • Launch ORCA.
  • Open the admin install MSI file (Ica32Pkg.msi) created earlier.
  • Select the Shortcut table.
  • Right click the row with “DesktopFolder…” in the Directory column and select Drop Row.

Enable Single Sign On for Active Directory Deployment
There is yet another “feature” in the client that disables single sign on in the client when deploying via Active Directory (see Citrix article CTX103439). As the article states, you will need to apply a transform (MST) in order for Single Sign On to work.
  • Download slfregfix.mst from http://support.citrix.com/article/entry.jspa?entryID=3936
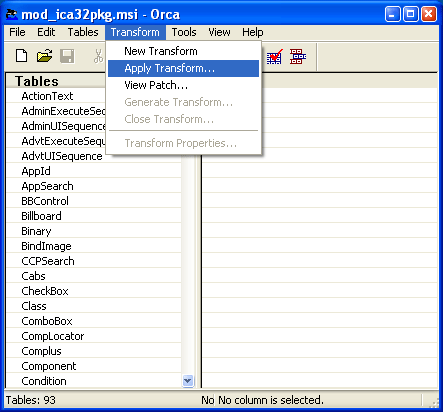
  • Launch ORCA
  • Open the Ica32Pkg.msi file created above.
  • Select Transform -> Apply Transform…
  • Browse to slfregfix.mst.
  • Click on File -> Save Transformed As… and save the package as a different name (such as mod_Ica32Pkg.msi).


Deploy the Package with Active Directory

Finally, after all the blood sweat and tears to create the admin install client package, you can deploy the package with Active Directory. The question you must answer here is do you want to assign or publish this package? Also, if you assign the package, do you want to assign it to computer or user objects? In this exercise, I assigned the package to computer objects. (For more information about assigning and publishing packages via a GPO with Active Directory, check out Active Directory® for Microsoft® Windows® Server 2003 Technical Reference)

 I strongly suggest you toughly test this in a separate test environment if you have one. If you do not have a separate test environment, at least create a test OU in your Active Directory to try this out.
  • Open up Active Directory Users and Computers.
  • Right click on the OU you want to use to host the GPO to deploy the package and select Properties
  • Select the Group Policy tab.
  • Click edit to edit an existing Group Policy or New to create a new Group Policy. (Again, I suggest creating a new GPO for testing purposes).
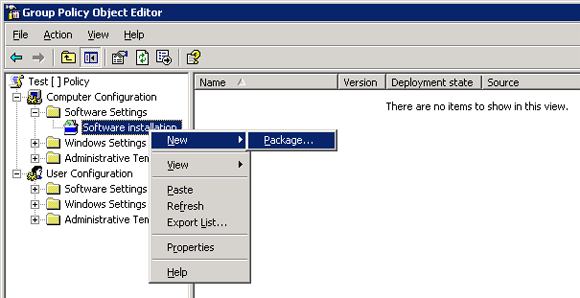
  • Browse to Computer Configuration -> Software Settings -> Software installation.
  • Right click Software installation and select New -> Package.
  • Browse to the package created above.
  • Select Assigned on the Deploy Software Dialog.

Now, any computer object you move into this OU will automatically have the pre-configured Citrix ICA client installed upon logon (I suggest you only try moving a few computer objects into the OU for testing purposes). 

Sunday, April 3, 2011

Publishing Network Application from a Mapped Drive Fails in XenApp 6

Symptoms
A published application is running from a network share as a mapped drive. In this example, the path to the executable is W:\windows\system32\notepad.exe. Launching the published application from a XenApp 6 2008 R2 servers and gives the following error(s).
“Citrix online plug-in could not contact the server. Please check your network connection.”

“The remote server failed to execute the application launch request. Please contact your administrator for further details.

The online plug-in does an application refresh. The server event viewer show an error similar the one below:
“Application XYZ is published to the server X, but the command line “w:\windows\system32\notepad.exe” is not valid on X. Verify the correct servers and/or work groups are assigned to XYZ and ensure that the application is installed on X.
Where XYZ is the application name and X is the server name.

For the application to launch, the drive must first be mapped for the user launching the session. There is no problem launching the application in a published desktop, but a published application fails.
Cause
XenApp 6 adds a new check called the Application Installation Check during load balancing to ensure that the published application exists on the server being returned by load balancing. The Citrix Services Manager service now ensures that the file specified in the application’s command line exists on the server selected by load balancing. If this check fails, you will see the error message listed above in the event log of the server.
Note: Because the application installation check is performed before the user’s session is created, user environment variables can no longer be used in an application’s command line. Only system environment variables are supported in XenApp 6.
The application installation check will retry load balancing up to five times to return a valid server to the user. This check is intended to prevent a few misconfigured servers from creating a black hole condition in the XenApp farm. However, administrators should always make sure that applications are installed at the correct locations on the correct servers, and not rely on this check for day-to-day load balancing.
Resolution
Publish a batch file that maps the network drive and then calls the application. You could also publish the path through UNC, but certain applications require a drive letter and are also run from a network share.
A simple batch file for this example could be something like the following code:
net use w: \\server-name\share-name
w:\windows\system32\notepad.exe
Name this batch file “my-app.cmd” and save it to a local drive such as C:\. In the published application location, point to the batch file rather than the network drive location.
This is by design in XenApp 6.0 because of the new Application Installation Check feature explained above.
for more info check -> http://support.citrix.com/article/CTX125104